
To attach a PVC patch to a hat, first check its backing and test its fit on the actual crown. Sew a patch with a stitchable border, heat press one only if it has a compatible heat-seal backing, or use a hook-backed patch with a loop panel for a removable badge. An unmarked PVC patch is not automatically suitable for heat or glue.
If you are sewing it by hand, hold the patch in position, stitch around its intended edge, and check both sides of the finished cap. A raised front seam or a curved panel can affect how the patch sits, even when it looks centered on flat artwork.
Which Method Should You Use to Attach a PVC Patch to a Hat?
Check the PVC Patch Backing Before You Start
Turn the patch over and confirm how it was designed to attach. A stitchable rim or recessed sew channel gives the needle a route around the raised logo. A heat-seal backing requires a specified press process; a hook backing needs a matching loop panel on the hat. Plain PVC, pressure-sensitive adhesive, and liquid glue are different constructions. Two patches can look alike from the front but require different methods.
Check the cap as well. Feel for reinforcement behind the front panel, identify the front seam, and place the patch on the real crown to see whether its edge lies flat. Consider where the needle will reach or where a curved press can make contact. A soft panel can wrinkle under tight stitching; a thick seam can interrupt heat contact. If you are still deciding between a badge and direct stitching, see our comparison of embroidery vs. patches on hats.
Sewing vs. Heat Press vs. Hook-and-Loop
| Method | Required patch and hat construction | Can it be removed? | Check on a sample |
| Sew on | Stitchable border; needle access and support for the cap front | Usually no | Edge stitches, crown shape, inner finish |
| Heat seal | Product-specific heat backing; compatible cap and press | Usually no | Full contact, bond, heat marks |
| Hook and loop | Hook-backed patch; loop panel already fixed to hat | Yes | Panel fit, edge hold, comfort |
| Adhesive | Specified adhesive system for the PVC and fabric | Depends on system | Bond after wear and care testing |
If the backing is unknown, ask the patch supplier before applying heat. “Iron-on” needs instructions for that exact patch; it is not a property of PVC in general.
How to Sew PVC Patches onto Hats: Step by Step
Tools and Materials Needed
Use a PVC patch with a sewable border, thread and a needle suited to the patch edge and cap fabric, removable position markers, scissors, and a form to support the crown. A thimble can help with hand sewing. For machine sewing, the cap fixture and equipment must reach the full stitch path. Test the combination instead of copying a universal needle size, stitch length, or thread tension.
Inspect the stitch path before piercing the patch. Follow the designated rim or channel, not the raised logo. If there is no usable border, request a sew-on version or consider another approved backing.
How to Hand Sew a PVC Patch onto a Hat?
1. Check the patch and cap. Confirm that the perimeter is meant to be sewn. Look inside the crown for lining, seam tape, sweatband, or other parts that could be caught by the needle. Decide whether the front seam creates a high spot under the patch.
2. Position the patch on the finished cap. View the crown from the front and at an angle, using the brim and front panels as guides. A raised center seam can affect how a centered patch looks. Keep the patch clear of the brim join and ventilation eyelets.
3. Hold the position without damaging the cap. Use a removable, fabric-safe method at the edge or a few temporary stitches where appropriate. Put a suitable form inside the crown so the front panel keeps its shape. Check that the patch has not shifted before sewing the full edge.
4. Sew through the intended border and the cap front. Work around the patch in small, even stitches that hold the perimeter without dragging the fabric inward. Keep the needle clear of the raised logo and do not pull each stitch so tight that a soft crown puckers. Recheck alignment as you turn the cap.
5. Secure and inspect. Finish the thread on the inside without a bulky knot against the wearer. Remove temporary holds, check the full edge for gaps or loose loops, and look inside for caught lining or rough thread ends. Put the cap on a form or wearer to judge the finished shape.
Hand sewing lets you control the fabric as you work around the edge. If the border is too thick to pierce or the front panel is difficult to reach, test another patch construction or attachment method. For a valuable finished cap, try the position and stitch path on a spare sample first.
How to Machine Sew a PVC Patch onto a Hat?
Machine sewing needs a patch with a sewable edge, a fixture that supports the cap front, and access around the intended perimeter. Check that the needle path clears the raised design. The brim, crown height, center seam, or a stiff patch may make that path difficult to reach.
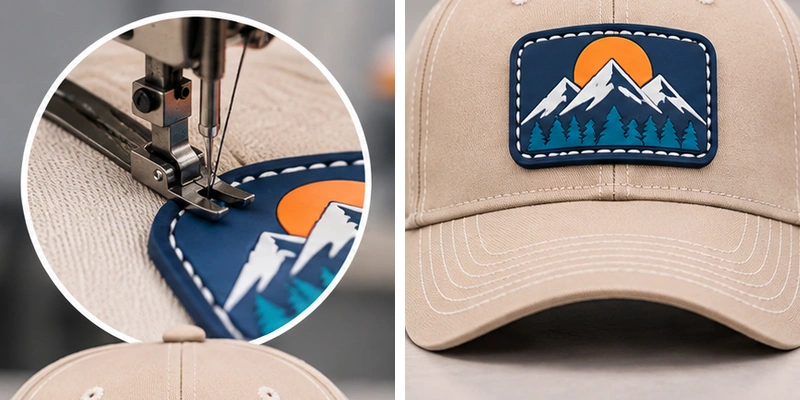
1. Approve the proposed patch size and position on the actual cap style, including how the border meets any center seam.
2. Select equipment, fixture, needle, and thread for that combination and sew a trial sample. Support the crown without flattening its intended shape.
3. Inspect the sample from the front, side, and inside. Check stitch continuity, border coverage, puckering, panel distortion, and any rough areas against the head.
4. Adjust the position, patch construction, or sewing setup as needed. Obtain approval of the physical sample, then record the approved configuration for the order.
These are production review steps, not a verified HENGXING machine setting or stitch specification. If the trial sample puckers or the border cannot be sewn cleanly, revise the patch or attachment method before ordering in bulk.
Real Example: HENGXING Sewn PVC Patch Baseball Cap
The navy baseball cap shown here has a round, multicolor PVC patch sewn directly to its front panels. Visible border stitches hold the patch across the center-front seam. The finished cap shows why placement should be checked on a curved crown as well as on artwork. HENGXING confirmed the material and attachment method for this product.
The product photos document the finished cap. They do not show whether the attachment was hand- or machine-sewn, the thread specification, the inside finish, or a durability test. A buyer developing a similar cap should request a physical sample and inspect those details directly. Explore custom baseball caps if this front-panel construction matches your collection.
Can You Heat Press a PVC Patch onto a Hat?
When Heat Pressing Is Suitable?
Some PVC patches come with heat-activated backing for compatible hats. Follow the instructions for that exact patch and test it on the selected cap. The fabric, coating, reinforcement, foam, seam, and brim can affect the result. A sew-on patch or an unmarked PVC back is not automatically heat-seal material.
Heat-seal systems can call for different platens, pads, and cooling steps. Use the patch supplier’s equipment and process requirements; a setting for another product is not a HENGXING production specification.
How to Apply a Heat-Seal PVC Patch Safely
1. Obtain the instructions for the exact heat-seal patch and confirm that the target cap material and equipment are approved.
2. Use a spare cap of the same construction for the first test. Support the curved front so the intended bonding area makes even contact; keep the brim and sensitive trim out of the heat zone.
3. Place the patch at the approved location. Use only the cover, pad, tape, and other protection specified for that patch and press setup.
4. Apply the supplier-approved time, temperature, and pressure. Follow its cooling and handling instructions before checking the bond.
5. Inspect the full perimeter, center-seam area, surface marks, crown shape, and inside of the cap. Record the sample result before repeating the process.
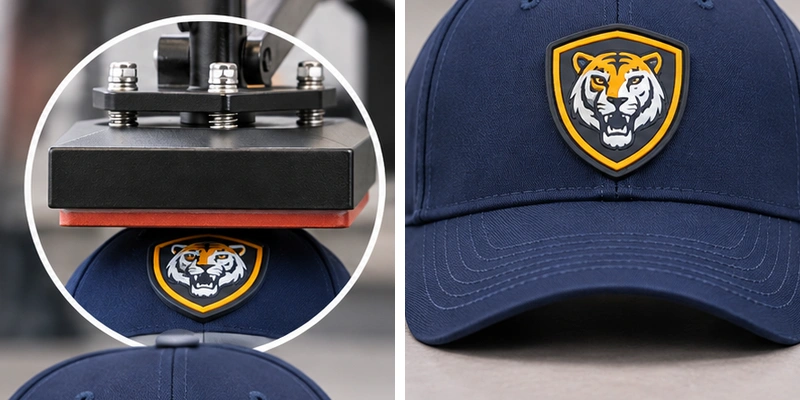
For a broader explanation of cap platens, transfer placement, and general press setup, read how to heat press baseball caps. This PVC section concerns the patch backing and finished-cap compatibility.
Heat Press Limitations and Precautions
A raised seam can prevent full contact beneath the patch. Foam, coatings, or synthetic trim may distort or show heat marks; too much heat can also affect the molded logo. If a test fails, check the materials and contact area before changing the process.
A household iron gives limited control over pressure on a curved crown. Use one only when the instructions for the exact patch allow it and a test on the selected cap succeeds.
Can You Attach PVC Patches with Velcro or Glue?
Attaching Removable PVC Patches with Hook-and-Loop
For a removable badge, pair a hook-backed PVC patch with a loop panel on the hat. Align the patch, press across its surface, and make sure no corner extends beyond the panel. Peel it off from an edge while supporting the hat front. A tactical cap may already have a loop field; a plain cap needs a suitable panel installed first.
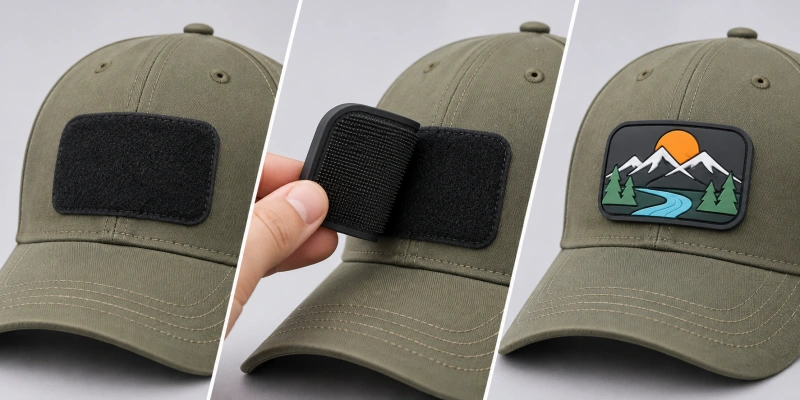
Check the shapes together. Unsupported edges or a stiff patch on a sharply curved crown can stand away from the hat. If wearers will swap badges often, test repeated removal and check comfort as well as appearance.
Can You Glue PVC Patches to Hats?
Glue is an option only when the adhesive is specified for the PVC back, the cap fabric or finish, and the intended wear and care. Ordinary craft glue is not a universal solution. Test a finished sample before approving an adhesive for bulk production.
A pressure-sensitive sticker, liquid glue, and heat-seal backing are different. Some sticker products are intended for smooth hard goods rather than fabric. Follow the specification for the actual patch and substrate.
How Does Hat Style and Fabric Affect PVC Patch Attachment?
A hat style name alone does not tell you how its front panel is built. Check the selected fabric and construction on a physical cap. The table shows what to inspect during sampling, not a fixed method for every hat in the category.
| Hat style | What to inspect | Practical starting point |
| Structured baseball cap | Front reinforcement, curve, center seam | Trial a sew-on patch; heat seal only with compatible backing and tested contact. |
| Soft dad hat | Flexible panel, wrinkles, wearing shape | Try a flexible, proportionate patch; manage sewing tension and inspect on the wearer. |
| Foam-front trucker hat | Foam response, front surface, heat sensitivity | Sample the proposed attachment; never infer heat suitability from the style name. |
| Fabric-front trucker hat | Panel count, seam, reinforcement | Test edge sewing or a verified heat-seal build on the selected fabric. |
| Snapback | Front structure, logo scale, brim clearance | Check stitch or press access on the physical cap. |
| Beanie | Stretch, knit openings, fit recovery | Test a compatible sew-on construction and comfort after stretching. |
| Tactical cap | Presence and size of loop field | Use a matching hook-backed patch for a removable design. |
A six-panel front adds a center seam under some patch locations. Move the badge slightly, change its size, or revise the patch edge if the sample sits high or wrinkles. On a trucker style, the rear mesh does not tell you whether the front is foam or fabric. For detailed sizing rather than attachment guidance, see trucker hat logo placement and size.
Common PVC Patch Attachment Problems and How to Fix Them
Stitching and Edge Problems
For a sewn patch with a lifting edge, check for missed stitches, loose thread, or a border that does not lie against the crown. Puckering can come from tight stitches or poor support as the cap is turned. Inspect the inside as well as the outside. If the patch has no suitable stitch path, sewing through its raised face is not a sound repair.
Heat-Seal Adhesion Problems
For a heat-seal patch with a lifting edge, check whether the seam prevented contact or whether the backing, fabric, and process were compatible. Shine, scorch, or compressed foam calls for a different remedy than weak adhesion. Pause production, compare the cap with the approved sample, and ask the patch supplier whether rework is allowed.
Positioning and Crown Distortion
| Symptom | What to examine | Next sample action |
| One edge lifts | Backing, stitch coverage or heat contact across curve | Test revised border, position or approved process. |
| Patch looks crooked | Visual center, front seam, brim alignment | View a pinned mockup from front, side and worn position. |
| Panel puckers | Patch stiffness, stitch tension, crown support | Try a smaller or more flexible badge and resample. |
| Heat mark or compressed foam | Cap material and press setup | Stop that configuration and test another method. |
| Rough inside finish | Thread ends, lining or backing area | Inspect on head form and revise interior finish. |
What Should You Check Before Ordering Custom PVC Patch Hats in Bulk?
Patch Design and Backing Requirements
For a quote and sample, send the cap style and front fabric, logo artwork, proposed patch dimensions and position, preferred attachment, quantity, and target date. Say whether the badge must be removable. If the backing is undecided, ask for a proposal tied to the exact cap. Specify the decorative PVC face and its attachment backing separately.
For a six-panel cap, show how the patch should meet the center seam. For a soft crown, review its flexibility and scale. If you want a sewn border, include it in the patch drawing before tooling or sampling; a later change to the outline can alter the stitch path.
Sample Approval and Attachment Quality Checks
Approve a physical cap with the proposed patch. Review material and backing, artwork and color, placement from several angles, edge finish, crown shape, and comfort against the head. Check stitch continuity and thread ends on a sewn version, the cooled bond and any fabric marks on a heat-seal version, or the panel fit and removal on a hook-and-loop version.
Agree on any care or durability test that the order actually requires and record the method and acceptance criteria before production. A single photograph of the outside cannot establish the interior finish or long-term attachment performance. Use the custom hat sample approval checklist for the rest of the cap specification.
Custom Hat Production Considerations
If the order uses different cap fronts, colors, or patch sizes, identify which combinations need separate samples. Keep the approved cap and attachment specification together, and agree on changes that require another sample. The quote should reflect the chosen cap, patch, backing, quantity, and any requested tests.
HENGXING can discuss patch decoration on custom trucker hats with patch options as well as the baseball cap shown above. Send your proposed combination so the attachment and sample can be reviewed before bulk production.
FAQs
Can You Remove a Sewn PVC Patch Later?
You can carefully unpick the stitches, but holes or marks may remain in the cap fabric. The patch may also be damaged during removal. Approve its position on a sample before sewing the production order.
Should a PVC Patch Be Attached Before or After Hat Assembly?
That depends on access to the stitch or press area, the cap construction, and the production setup. If the patch will be added to a finished cap, test that exact arrangement on a complete sample.
Can You Wash a Hat With a PVC Patch?
Follow the care instructions for both the cap and the patch attachment. Ask for a care test if washing is part of the intended use; the PVC face alone cannot establish how the finished hat should be cleaned.
Developing custom PVC patch hats? Send HENGXING your cap style, front fabric, artwork, proposed patch size and position, backing preference, order quantity, and target date. We can review the construction and prepare the attachment details for sample approval. Start with custom baseball caps or custom trucker hats for the hat style you need.