
A baseball cap begins with an agreed design and an approved sample. The maker checks materials, cuts the crown and brim pieces, applies suitable decoration, sews and assembles the cap, shapes it, checks it against the approved specifications, then packs it for shipment. Some work happens in parallel, and the order of decoration can change with the design. The sample and production checks are what connect those steps to the cap you actually ordered.
If you buy caps for a brand, distributor, or team, knowing the sequence helps you ask better questions. It also shows you when a change to the logo, brim, fit, or material may require another sample. Below is the typical factory workflow HENGXING describes, with the decisions that matter before a bulk order. This is a manufacturing guide rather than a home sewing tutorial.
The Baseball Cap Manufacturing Process at a Glance
| Stage | Your decision or check |
| Specifications and approved sample | Agree on shape, fit, colors, logo, construction and packaging. |
| Material preparation and cutting | Check inputs and cut panels and brim fabric to the selected pattern. |
| Decoration and component preparation | Prepare logo work, crown panels and brim components; some operations can overlap. |
| Sewing and assembly | Join the crown and attach the brim and style-specific components. |
| Shaping and finishing | Bring the cap to the agreed silhouette and remove loose threads. |
| Quality and packing | Compare with approved requirements, check the packed order and prepare it for shipment. |
The table is a route through the job, not a rule that every cap crosses one machine in this exact order. The brim can be prepared while crown panels are decorated, and some artwork is applied at a different stage. Material checks, work-in-progress checks, and final checks sit across the sequence. HENGXING’s factory overview describes the production stages behind this outline; your style sheet and approved sample determine the details.
Before Production: Agree on the Specifications and Sample
A factory needs more than a logo file to reproduce the hat in your brief. You first agree on the cap style, panel layout, crown profile, front support, brim shape, fabric, and color. Then you settle on fit and closure, the artwork method and placement, and any labels or packaging. The specifications are turned into a pattern and a sample that you can handle, measure, and photograph. When you approve that sample, it becomes the practical visual reference for bulk production.
It is useful to mark each measurement with its start and end points. “Front height” can mean different things if one person measures straight up and another follows a curved seam. Specify the head-size range separately from crown depth. If you supply a reference cap, tell the maker which parts must match and which can change. An approved fabric swatch and color reference help avoid disagreements caused by photographs taken under different light.
Review your artwork at its intended finished size on the sample. A digital mockup can show placement, but it does not show how stitching, a patch, or a print will look on the chosen fabric and seams. Ask which features of the approved sample are production controls and record any revisions before moving forward. For an order with several colors or logo versions, state which combinations need separate approvals.
Step 1: Prepare Materials and Cut the Panels
Production begins by checking the selected fabric and components against the agreed order. The supplier looks for the required color and visible defects, confirms what is to be used for the brim and inner parts, and makes sure the appropriate trims are available. This check matters because a small material change can affect the crown’s hand feel, the way it holds its shape, and how the logo appears.
The approved pattern guides the cutting of crown panels and fabric pieces for the brim. Consistent cutting helps adjacent panels meet at the right points. If one piece is distorted, the assembled crown can look asymmetrical even if the stitching itself is tidy.
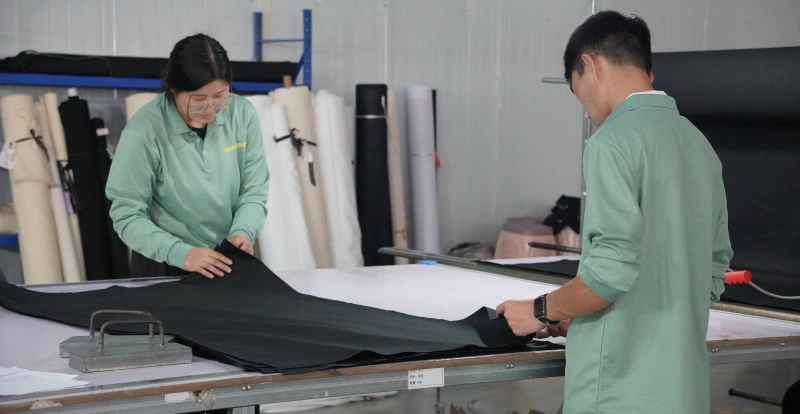
Placement and orientation also matter when fabric has a visible grain, nap, stripe, or repeat. A manufacturer should check the relevant pattern pieces and first cut parts before repeating the operation across an order.
Different cap designs call for different material combinations. Cotton, polyester, nylon, and mesh can be discussed, but a fabric name alone cannot tell you how a finished cap will perform. Our guide to what baseball caps are made of explains the materials in more detail; here, your key manufacturing decision is whether the selected material works with the approved pattern and decoration.
Step 2: Prepare the Logo and Brim Components
Some designs allow embroidery or another decoration to be applied to a flat panel before the crown is sewn. That access can make the front easier to work on, but it is not a universal rule. A patch, print, transfer, or secondary placement may call for a different sequence.
HENGXING discusses embroidery, patches, and selected printing or transfer options according to the artwork and material. You should confirm the method and stage on the production specification rather than assume every logo is added at the same point.
At the same time, the brim can be prepared as a separate component. Its selected shape, fabric covering, stitching, and internal construction need to match the sample. A flat and a curved brim are not interchangeable details at final inspection: they change the cap’s appearance and sometimes its finishing work. If brim shape is central to your design, the baseball cap brim guide gives you the vocabulary to describe that choice without guessing from a product photo.
Check a decorated trial panel or sample for letter clarity, thread or print color, alignment, and distance from the eventual brim seam. A mark that looks centered on a loose panel may need a second look after the cap is assembled and worn. Approving both the flat artwork placement and the final cap view gives you a clearer reference than approving an isolated logo file.
Step 3: Sew the Crown and Assemble the Cap
The cut panels are sewn into a crown according to the pattern. This is where seam alignment starts to determine the cap’s final symmetry. A structured design may include front support; a softer design may not. The selected brim is joined to the crown, and the remaining components are assembled according to the style. Those can include a sweatband, seam tape, eyelets, a top button, or a back closure, but no single cap needs every option.

Each added component creates another point to inspect. Look at how the brim meets the crown at both sides, whether the center front aligns with the intended logo position, and whether the closure is secured and adjusts as specified.
The count and arrangement of the panels also change where seams fall. If you need a quick explanation of the crown, brim, sweatband, and closure before you approve a sample, see the parts of a baseball cap guide.
Sewing a cap is not simply joining a fixed set of six identical pieces. A five-panel front, a mesh back, or an unstructured crown changes the pattern and operations. What should remain consistent is the approved design for that style. When you review a production sample, compare it with the approved reference rather than with an unrelated cap from a catalogue.
Step 4: Shape and Finish the Cap
Once the cap is assembled, finishing brings its silhouette closer to the approved sample. The way a crown holds its form depends on the pattern, support, material, and finishing approach. HENGXING’s published factory process includes shaping and finishing, but it does not establish one equipment setting or treatment suitable for every fabric and style. You should judge the result on the actual sample.
Inspect the cap from the front and both sides. Compare crown height and angle, brim curve, seam balance, and how the front settles when worn. Loose threads, marks, or trapped fabric at joins should be addressed before the item is packed. A cap can have accurate sewing and still look wrong if its crown shape or brim differs from the approved reference.
Step 5: Check Quality During Production and Before Packing
Quality is checked at more than one point. Incoming materials can be compared with the agreed fabric and color. The pre-production sample gives the team a reference for shape, fit, and decoration. During production, checks can catch a seam or placement problem before the same issue is repeated across more caps. Final inspection compares finished caps with the approved requirements; packing checks verify that the right items and labels go into the order.
For a baseball cap, useful inspection questions are concrete: Are the front panels balanced? Do the key dimensions follow the approved specification? Is the logo correctly positioned and legible? Are seams sound, is the brim even, and does the closure work as intended?
Are fabric shade and component colors consistent with the agreed reference? You can ask the supplier to show how these checks are recorded for your style. HENGXING’s quality and compliance process describes its published checkpoints, while the actual tolerances and inspection method should be agreed for the project.
Be careful with vague phrases such as “perfect quality.” A workable approval tells the factory what to measure and what visual sample to compare against. If you require a particular test, reporting format, or destination-market document, include that requirement before production. A general website description cannot substitute for the current records or product-specific evidence you may need for an order.
Step 6: Pack Finished Caps for Shipment
Before packing, the order should be matched against the agreed style, colors, quantities, labels, and packaging instructions. Packing may be simple or may involve brand-specific inserts and carton marks; the choice belongs in the brief. Count checks and the condition of the packed caps matter because a well-made hat can still reach you in the wrong assortment or with damaged presentation.

A finished and inspected cap is not the same thing as a dispatched order. Shipping arrangements, carton information, and any required documents must also be confirmed. If your delivery depends on a launch date, discuss the schedule against the actual materials, decoration, order volume, and approvals rather than relying on a fixed production-time claim from a different style.
Why Does the Process Change With the Cap Design?
Most baseball caps share cutting, decoration, assembly, shaping, inspection, and packing. The exact checks and order of work change when you change the design. These examples show which decisions to settle early:
| Design decision | What it changes in production or approval |
| Structured or soft front | Front support and how the crown holds its silhouette; inspect the finished front and decoration. |
| Five or six panels | Pattern pieces and seam positions; inspect symmetry and how seams meet the logo. |
| Flat or curved brim | Brim preparation and final shape; compare with the agreed sample. |
| Embroidery, patch or print | Artwork preparation and possible application stage; inspect color, detail and attachment. |
| Back closure and labels | Assembly details, adjustment range, and the matching of components to the order. |
If front firmness is the main choice, you can compare structured baseball caps with unstructured baseball caps before settling on your pattern. Those are product design pages; the process here shows why your choice affects a production specification. A cap may combine features from several categories, but any proposed combination still needs to be tested in the selected material and approved as a sample.
What Should You Verify Before Bulk Production?
You can reduce avoidable rework by putting decisions in one approval record. Before you sign off a production sample, check the following with your supplier:
- The style, pattern or sample reference, including crown profile and panel layout.
- Head-size range and measured points for crown depth, front height and brim.
- Fabric composition or approved swatch, colors, and style-specific trims.
- Logo file, finished size, method, location, and a decorated sample view.
- Front support, sweatband, eyelets, closure, and any other selected components.
- Labels, packaging, color assortment, and carton-mark instructions.
- Any destination-market, documentation, or test requirements agreed for this order.
- The process for recording sample revisions and approving the final reference.
Share a physical reference or clear photos if your target shape is difficult to describe. Ask for the specification and decorated sample to be reviewed together; a change to one can affect the other. Where a requirement is still undecided, label it as open instead of allowing it to become an assumption on the factory floor.
You can outline the style and order details through HENGXING’s custom baseball caps page and then confirm the project-specific minimum quantity and timing.
FAQs
Are Logos Embroidered Before or After the Cap Is Sewn?
Both sequences are possible. A front-panel design may be embroidered while the panel is flat, while another placement or method can call for later work. Confirm the sequence for your artwork, fabric, and selected cap in the sample and production specification.
Are All Baseball Caps Made in the Same Order?
No. The broad stages are similar, but the brim and crown may be prepared in parallel, and the decoration stage depends on the method and placement. Panel count, front support, and accessories also change the assembly steps.
How Long Does Custom Baseball Cap Manufacturing Take?
Timing depends on the material, approved sample, decoration, quantity, and current production arrangements. Ask for a schedule for your actual style, including approval milestones, rather than applying a single number to every cap.
What Should You Check on the Pre-Production Sample?
Check fit and key dimensions, crown and brim shape, material and color, logo at finished size, seams, closure, labels, and packaging details. Record changes and approve the final version that will serve as the bulk-production reference.
Does a Structured Cap Need a Different Process?
The core stages remain, but front support adds a construction choice and a shape to approve. Check that the assembled front holds the agreed outline and presents the logo as expected; do not infer crown height or fit from “structured” alone.
Start With the Sample You Want to Repeat
You do not need to specify each sewing operation to place a cap order. You do need to show the maker the cap you want, approve the material and decorated sample, and agree on what will be checked as production continues. Send your reference, artwork, intended quantity, and delivery market so the factory can review the pattern, process, and order requirements together.