
You may ask which embroidery method is best for your hats. The answer? It depends on your design, your hat’s purpose, and your budget. No single choice always beats the other.
Several things shape your decision: detail, boldness, durability, cost, hat fabric, and production speed. The difference between flat and 3d embroidery matters most when you compare these elements. For example, 3d embroidery costs about $3.00 more per hat than flat embroidery.
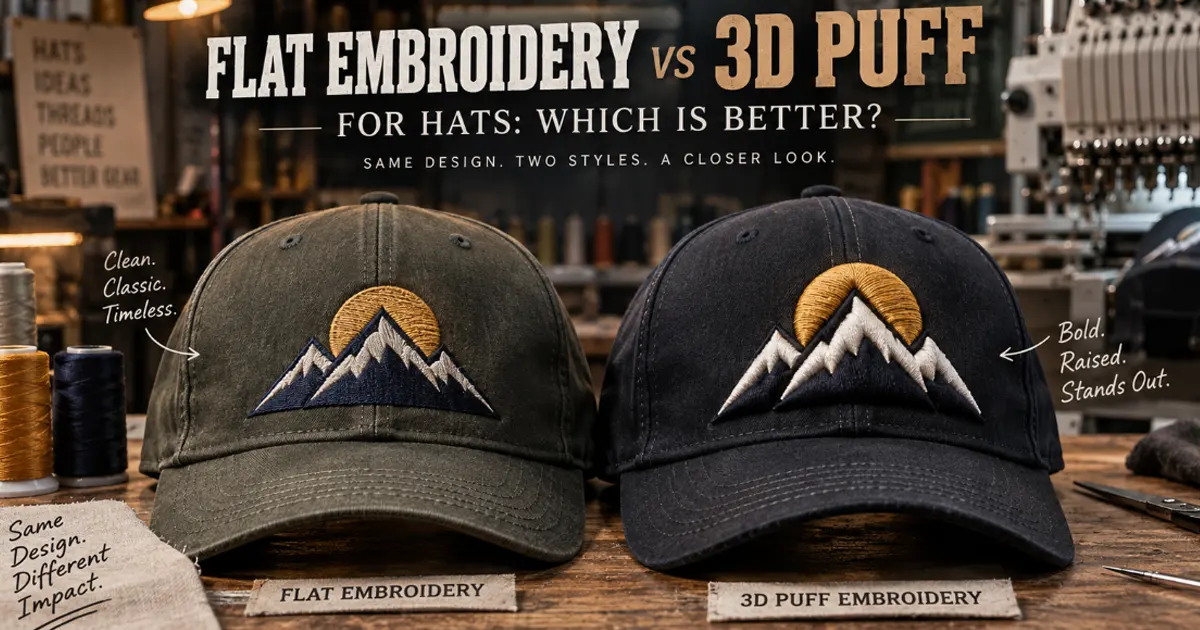
This flat embroidery vs 3d puff comparison will walk you through each option. You will see how each method changes the look and effect of your logo. We will also match embroidery techniques to specific hat styles, so you can choose the right one with confidence.
Key Takeaways
- Flat embroidery uses no foam and lies smooth on fabric.
- 3D puff embroidery uses foam to create a raised effect.
- Flat embroidery handles fine details and many colors well.
- 3D puff embroidery makes bold logos pop with dimension.
- Flat embroidery costs less and works on most hat fabrics.
- 3D puff embroidery costs more and needs structured caps.
- You can combine both methods for impact and detail.
- Choose based on your design, hat style, and budget.
What Is Flat Embroidery?
Flat embroidery, also called surface embroidery, is a traditional way to stitch designs right onto the fabric. There is no foam or padding underneath to make it pop up. The stitches lie flat against the fabric, giving a smooth, clean look. This method uses tight, careful stitching to follow shapes and show small details. Because there is no foam or height, tiny text, detailed logos, and color changes can be made more accurately. Unlike 3D puff embroidery, flat embroidery does not use foam or layers, so it looks subtle and polished.
Flat Stitching Explained
Threads Lie Smooth Against Fabric
With flat embroidery, a single flat layer of thread sits smoothly on the fabric. The stitches stay close to the surface, so the design looks clean and classic. There is no depth or raised texture. This gives your hat a neat look that works well for professional branding and simple styles.
No Foam, No Raised Depth
The big difference from 3D puff is simple: no foam. Flat embroidery leaves out the foam backing completely. That means no raised depth and no bulky feel. Your hat stays light and comfortable. The design also avoids the risk of raised parts snagging or coming loose over time.
Strengths of Flat Embroidery
Fine Detail and Small Text
Flat embroidery can reproduce tiny details, small text, and multi‑color art much better than 3D puff embroidery. You can stitch small monograms, thin lines, and delicate patterns with great accuracy. Flat embroidery works best when your logo has complex shapes or small letters. The stitches stay close to the fabric, so even hard logos come out clear and easy to read.
Multi‑Color Artwork and Durability
Flat embroidery handles many colors and gradients easily. You get rich, multi‑color artwork that keeps its good looks over time. The single flat layer of thread makes it generally stronger than 3D puff. There is less chance of snagging or fading. This strength means your hat stays nice during daily wear and washing.
Best Hats for Flat Embroidery
All Fabrics and Curved Panels
Flat embroidery works on almost any material. You can use it on cotton, polyester, canvas, twill, wool blends, and sports fabrics. It also works on leather and some straw hats. This wide use on fabrics makes it the safer choice for complex or thin materials. Curved panels are fine too. Structured hats with buckram backing are best, and unstructured dad hats also work well with careful design.
| Fabric | Recommended Style | Key Notes |
|---|---|---|
| Cotton twill | Structured baseball cap | Most reliable, holds shape well |
| Wool blend | Structured cap | Rich look, good for high‑end branding |
| Polyester performance | Structured cap | Durable but slippery; needs careful hooping |
| Acrylic knit | Beanie | Best for cuff decoration |
Budget and Fast Turnaround
Flat embroidery costs less per hat than 3D puff. It also works faster, so you get quicker turnaround times. If you need affordable hats with detailed logos, this method works well. It fits corporate, retail, and promotional use. You get a professional look without the higher price.
What Is 3D Puff Embroidery?
3D puff embroidery, also called 3d embroidery, uses a foam backing material to create a raised, three-dimensional effect. You get a look that stands out from the hat surface. This technique adds boldness and texture to your design. The foam insert is the key difference from flat embroidery. With flat stitching, standard threads lie flat against the fabric. With 3d puff embroidery, the stitches cover foam to create height.
3D Embroidery Basics
Foam Backing Under Stitches
A foam piece cut to your design’s shape goes on the hat first. The machine then stitches over it, so the thread caps the foam. This produces a raised or “popped” look that stands out more than flat embroidery. You will notice the difference right away, especially on caps and structured hats.
Two main foam types exist for this method. Standard 3D foam is 3 mm thick and has a soft, supple feel. It creates a rounded raised ridge. Firm 3D foam is also 3 mm but gives a sharper, squared edge. Firm foam delivers a more dramatic raised effect. You can use single or double layers for extra height.
Raised, Textured Effect
The 3d effect comes from the foam layer under your stitches. This creates depth and texture you can see and feel. The raised effect makes your logo pop off the hat surface. This visual appeal draws attention to your brand. The appearance feels premium and modern.
Strengths of 3D Puff
Bold Wordmarks and Logos
The benefits of puff embroidery shine with bold lettering and strong symbols. This method works best for well-separated lettering and simple shapes. Fine lines and crowded artwork can lose definition. You get the best quality when your design has thick strokes and clear gaps. Bold lettering becomes a focal point that people notice.
Eye-Catching Dimension
The 3d effect creates instant visual impact. Your logo gains a tactile quality that flat stitching cannot match. This dimension works great for streetwear brands and premium caps. The raised effect adds perceived value to your product.
Best Hats for 3D Puff
Structured Caps and Flat Fronts
This application works best on structured hats. Snapbacks, trucker hats, flat brim 6-panels, and fitted performance caps all work well. Popular options include the Richardson 112, Yupoong 6006, and Flexfit 180. Structured hats are preferred if possible for added support. The foam and stitch density need a sturdy base.
Simple, Large Designs
Your design must have line thickness between 0.2 and 0.5 inches. You also need at least 0.05 inches of spacing between lines. Thin scripts or tiny gaps will not hold the foam cleanly. This method costs more and produces slower than flat embroidery. The learning curve is real, especially on materials like snapbacks.
Flat Embroidery vs 3D Puff: Key Differences
Now that you know how each method works on its own, let me show you how they compare side by side. This is where you see the real trade-offs. Every choice you make affects your design options, your budget, and how long your hats hold up.
Detail and Design Limits
Minimum Text Height
Flat embroidery works much better for small text. Your letters stay easy to read even at very small sizes. That size works for most logos and small wordmarks. Just remember that thin or script fonts need a little more height to stay clear. Open, bold letterforms hold up well at that smallest size.
3D puff embroidery needs more space. Your text must be at least a certain size, typically with thicker strokes and more spacing. That extra room lets the foam sit right under the stitches. Different font styles have their own smallest heights. That gap matters when you design small logos or tight taglines.
Color Count and Gradients
Flat embroidery handles multi-color designs and gradients with no trouble at all. You can switch thread colors every few stitches. The result stays clean because every thread lies flat against the fabric. Complex emblems with three, four, or even six colors look sharp with this method.
3D puff embroidery has a hard time with color variety. Each color change makes the stitching pause. The foam underneath can shift during those pauses. You also lose detail where colors meet. Gradients are almost impossible because the raised surface blurs color changes. Stick to one or two colors for puff designs. That keeps the bold, raised effect clean.
Durability and Wear
Foam Breakdown vs Flat Stitch Longevity
Flat embroidery holds up very well. The stitches sit flush against the fabric, so nothing sticks out to catch on anything. Your logo stays intact through daily wear and repeated washing. This strength makes flat embroidery a solid choice for hats you plan to use a lot.
3D puff embroidery does not last as long. The foam layer inside can break down over time. After many washes, the raised surface starts to flatten. Common problems include foam flattening from heat, edge peeling, and backing bubbling. High heat during ironing or drying melts the foam for good. Machine washing puts stress on the edges, which causes peeling.
Washing and Daily Use
Flat embroidery handles normal care with no special rules. You can machine wash your hat on a gentle cycle and let it air dry. The threads keep their color and shape through dozens of washes.
3D puff embroidery needs gentler care. Hand washing is safer. If you use a machine, pick a delicate cycle and cold water. Never iron directly over the puff area. Skip machine drying completely—the heat will flatten the foam. This extra care keeps your hats looking good longer, but it adds limits for everyday use.
Cost, Speed, and Fabric
Price Per Unit and Setup
Flat embroidery keeps your costs lower. Each unit costs less than 3D puff. Setup uses standard digitizing files, so there is no extra charge for special designs. Your per-unit overhead stays low even on small orders.
3D puff embroidery costs more upfront. That higher price comes from the foam material, the extra trimming pass after stitching, and more machine time. Setup also costs more because puff digitizing is a different skill—flat files cannot be reused without redigitizing. Foam waste on small orders is harder to spread across many units.
| Factor | Flat Embroidery | 3D Puff Embroidery |
|---|---|---|
| Cost per unit | Lower | Higher |
| Setup complexity | Standard digitizing | Specialized digitizing |
| Thread usage | Lower (1× baseline) | Higher (1.5×–2×) |
| Extra consumables | None | Foam material and trimming |
| Labor after stitching | Minimal | Hand trimming required |
Production Turnaround and Material Fit
Flat embroidery runs faster. Production moves at a standard speed with no extra steps. Your order ships sooner, and you can plan quicker turnarounds. This method works on almost any hat fabric—cotton, polyester, twill, wool blends, even leather.
3D puff embroidery takes longer. The foam adds time at several points: cutting, placement, stitching, and trimming. That delay adds up on larger orders. Fabrics must be sturdy and structured. Lightweight or stretchy materials cannot hold the foam properly. Stick to structured caps like snapbacks, trucker hats, or fitted performance hats for the best results.
These embroidery techniques each have a clear effect on final appearance and cost. The key difference comes down to boldness versus detail. 3D embroidery gives you impact but needs simple designs and careful care. Flat embroidery offers precision, durability, and lower cost. Your choice of method changes more than just the quality of your logo—it changes your whole production plan.
Choosing Between Flat and Puff Embroidery
You now know how each method works. Making the final choice depends on your design, your hat fabric, and your goals. Here is a clear guide to help you decide.
When Flat Embroidery Wins
Flat embroidery is best for making detailed, exact designs with a smooth and neat finish. This method captures fine details and gives a flat, clean look that works well for logos, text, and any design where clarity is most important.
Detailed Logos and Multi-Color Emblems
When your logo has thin lines, small text, or many colors, flat embroidery works every time. It handles tricky designs with great accuracy. Text comes out sharp and easy to read. Complex patterns copy correctly. A wide range of colors works without any problem.
The rule is simple: pick flat embroidery when readability and fine detail matter more than raised height. If your design has a detailed emblem with thin letters and many color changes, this method keeps everything clear. You do not lose sharpness where colors meet. That makes it the best choice for complex brand logos.
Thin Fabrics and Tight Budgets
Flat embroidery works on almost any material. Lightweight fabrics like unstructured dad hats or stretchy beanies hold it well. There is no foam to make them heavy or cause sagging. Soft fabric moves naturally with the stitching.
Compared to 3D embroidery, regular embroidery is usually a more cost-effective option. The simple technique and fewer materials make it a budget-friendly choice for large orders or promotional giveaways.
That cost benefit matters when you order many hats. You get a professional look without the higher price. Also, production goes faster. There are no extra steps like foam cutting or hand trimming. Your order ships sooner.
Keep a few best practices in mind. Always digitize specifically for caps, not flat clothes. The cap curve, center seam, and limited stitch area need proper pull compensation and density. Test every cap style before full production to avoid puckering or distortion.
When 3D Puff Embroidery Wins
3D puff embroidery creates a raised, textured look that flat stitching cannot match. It adds boldness and depth that catch attention from across the room. This is the method for making a statement.
Bold Wordmarks and Premium Streetwear
The raised effect adds perceived value that customers notice.
This technique allows brands to command a premium over standard flat-stitched hats.
That premium is real. People connect the raised effect with quality and exclusivity. For streetwear brands especially, the bold look shows that your product is at a higher level. Hats and caps benefit from puff embroidery because the small space gives you the perfect chance to add texture and depth without overcrowding the accessory. The unique design makes an impression and helps your brand stand out.
Structured Caps and Simple Shapes
Puff embroidery needs a strong base. Structured caps with firm front panels work best. The stiff buckram backing supports the heavy foam and dense stitches. Snapbacks, trucker hats, and fitted performance caps all work.
Your design must stay simple. Letter widths should be at least 0.2 inch for clean results. Block lettering works better than serifs or small script details. The rule is clear: choose 3D puff when your logo is bold, simple, and made for high visual impact from far away. Use one or two colors at most to keep the raised effect clean.
Matching Technique to Hat Style
Different hat styles need different methods. Getting this match right makes or breaks your final product.
Trucker Hats, Snapbacks, and Beanies
| Hat Type | Recommended Embroidery | Reason |
|---|---|---|
| Snapbacks, Truckers, Pro-Style (structured) | 3D Puff | Stiff buckram backing supports heavy foam and dense stitches |
| Dad Hats, Beanies, Light Performance Caps (unstructured) | Flat | Soft fabric would sag and pucker under 3D puff weight; flat embroidery moves with the fabric |
Structured caps with firm front panels handle all embroidery styles. That is why trucker hats, snapbacks, and structured baseball caps commonly have embroidered logos. Popular models like the Richardson 112, Yupoong 6006, and Flexfit 180 are go-to choices for 3D puff work.
Unstructured hats like dad hats are good for flat embroidery because the design relaxes with the soft fabric. Beanies get embroidered before shaping, with the knit held flat. Their stretchy material prefers solid, mid-weight logos over fine detail. Stick with flat stitching for these styles.
Corporate, Retail, and Promotional Use
For corporate branding, flat embroidery wins every time. Company clothes and uniforms need a clean, professional look. Flat embroidery gives that look at a lower cost per hat. It handles tricky logos with many colors and small text easily.
For promotional products and retail streetwear, 3D puff embroidery creates the bold impact that draws attention. The raised effect makes giveaways feel more valuable. Customers see higher worth in a puffed logo versus a flat one.
Your final choice depends on your audience. If you need a neat, readable logo that fits any budget, go flat. If you want a bold, high-impact look that commands a premium, go puff. When to use each method depends entirely on what your brand needs to say and who needs to hear it.
Can You Combine Flat and 3D Puff?
Yes, you can use both methods on one hat. This mix gives you the best of both. You get the bold, raised look of 3d puff embroidery for your main logo. You also get the sharp detail of flat embroidery for small text and fine lines.
The Hybrid Embroidery Approach
Puff for Main Element, Flat for Details
Use 3d puff embroidery for the big, bold part of your design. Think chunky sports logos, brand initials, or mascot emblems. These simple, solid shapes work best with foam underneath. Then switch to flat stitching for fine lines, small text, and many colors. This mix keeps every part of your logo clear and easy to read.
For designs with large fill areas, you can pair satin puff elements with flat fill elements. This method is harder to do, but it gives a striking result. When your design has fine lines or very small text, simplify the artwork or mix flat stitching with puff stitching. That way, nothing gets lost in the foam.
Balancing Impact and Readability
A hybrid design balances visual impact with readability. The raised parts grab attention from far away. The flat parts stay crisp up close. This mix works great for premium streetwear and branded caps. Your logo looks dynamic without losing clarity.
The 3d effect draws the eye to your main element. The flat areas guide the eye through the rest of the design. Together, they create a polished look that feels planned and high-end.
Tips for Hybrid Hat Designs
Avoiding Foam Interference
Foam can mess up small text if you are not careful. Keep your foam sections separate from your flat sections. Leave enough space between them so the foam does not push into the flat stitching. This separation protects the quality of your fine details.
Follow a clean stitching order. Run placement stitches first to mark edges. Pause to put pre-cut foam. Hold the foam with masking tape above and below to stop shifting. Then go back with tight satin stitches to cut through the foam edges cleanly. After stitching, tear away extra foam and trim jump threads. Keep stitch density reasonable, because foam can only take so many needle holes before it breaks down.
Working with Your Embroiderer
Talk to your embroiderer about digitizing before you finalize your design. Good digitizing can make or break a hybrid project. Your digitizer must plan stitch direction to create shadow and guide attention across both flat and raised parts. Underlay acts as hidden support that lifts the surface and controls fabric movement. Without proper underlay, raised embroidery may sink into the material or lose shape after wear.
Compensation matters too. Thread naturally pushes and pulls on fabric, especially with higher stitch counts. Raised designs need your digitizer to predict these forces and adjust so the finished logo matches original sizes. This step is very important for small lettering, complex borders, and layered hybrid designs. Ask your embroiderer to check that the presser foot height is set right for the foam. Use designs made specifically for 3d embroidery. Fine-tune thread tension to reduce breakage. A skilled digitizer blends flat embroidery, raised accents, and smooth stitch changes. The skill is choosing the right production plan for your garment, brand identity, and artwork complexity.
Conclusion
So, which one wins? Flat embroidery works well for complex, multi-color, and low-cost designs. 3d puff embroidery works well for bold looks on structured hats. Both have a place, and the flat embroidery vs 3d puff debate has no single answer.
Match the method to your design, hat material, budget, and audience. Puff embroidery adds drama and depth, but unstructured hats may not support that raised effect. Flat stitching keeps detail and durability. That is why choosing between flat and puff embroidery deserves real thought, not guesswork.
We are a hat manufacturer offering OEM and ODM services. Contact us for guidance on your next order of custom embroidered caps or custom embroidered hats. Great 3d embroidery, like all quality work, comes from thoughtful technique selection, not trends. Your appearance and effect will thank you.
FAQ
Can you use 3D puff on unstructured hats like dad hats?
Not really. The flat embroidery vs 3d puff choice gets easier here. 3D puff needs structured caps with stiff front panels. Stick with flat embroidery for dad hats and beanies.
How long does 3D puff last compared to flat stitching?
3D puff lasts less time. The foam inside breaks down over time. High heat during ironing or drying melts the foam for good. Flat stitches hold up better through daily wear and washing.
Which technique costs more for custom hats?
The 3d embroidery method costs more. Foam materials and hand trimming drive the price up.
Can you machine wash a hat with raised embroidery?
It depends. Flat stitching handles machine washing fine. A raised design needs careful care. Hand wash in cold water. Never iron directly over the raised area. Machine drying will flatten the foam.
What is the smallest text size for each technique?
Standard stitching handles text down to very small sizes. 3D puff needs larger text for clean results. Bold letterforms work best.
Can you combine flat and raised stitching on one hat?
Yes. The hybrid approach uses puff embroidery for bold main elements and flat stitching for fine details and small text. This balances visual impact with readability. Work with your embroiderer on digitizing.
Which option works better for corporate hats?
Standard stitching wins for corporate use. It handles detailed logos with multiple colors and small text. The clean, professional effect suits any brand. 3D puff works better for streetwear and bold branding.